Creating separate contact lists in Wix Email Marketing is easy. It helps organize and target your emails better.
Email marketing is a powerful tool for businesses. On Wix, you can manage your contacts efficiently by creating separate lists. This makes it simpler to send personalized messages to different groups. Whether you want to segment customers by their interests, purchase history, or engagement level, having separate contact lists is essential.
Doing so can improve your email open rates and conversions. In this guide, we will walk you through the steps to create and manage separate contact lists in Wix Email Marketing. This ensures your campaigns are more targeted and effective. Let’s get started!
Getting Started With Wix Email Marketing
Wix Email Marketing is a powerful tool. It helps you reach your audience effectively. Creating separate contact lists can make your campaigns more targeted. This guide will help you get started with Wix Email Marketing.
Setting Up Your Account
First, log into your Wix account. If you do not have one, create it. Go to the Wix Email Marketing section. Click on “Get Started” to set up your email marketing account. Follow the prompts to complete the setup process.
Next, verify your email address. This step is crucial. It ensures your emails are sent from a verified source. Check your inbox for a verification email from Wix. Click on the link to verify your email.
Navigating The Dashboard
Once your account is set up, access the dashboard. The dashboard is your control center. It shows your campaigns, contacts, and performance stats. Familiarize yourself with the layout. Take note of the different sections and tools available.
On the left-hand side, you will find the main menu. This menu includes options for creating new campaigns, managing contacts, and viewing analytics. Explore each section to understand its function. This will help you navigate the platform more easily.
To create separate contact lists, go to the “Contacts” section. Click on “New List” to start a new contact list. Name your list and add contacts manually or import them from a file. Creating separate lists helps you send more targeted emails.
Creating Your First Contact List
Creating your first contact list on Wix Email Marketing is simple. This guide will help you set up your list step by step. Starting with accessing the contacts section and ending with adding contacts manually. Follow these steps to keep your email marketing organized.
Accessing The Contacts Section
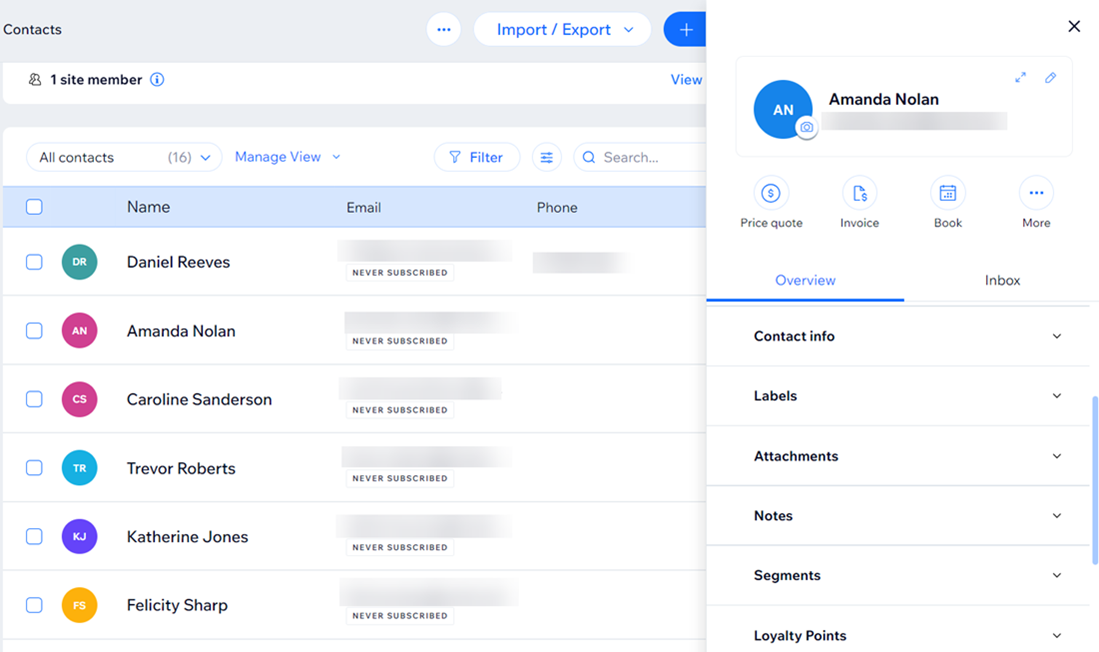
First, log in to your Wix account. Go to your dashboard. Look for the ‘Contacts & CRM’ menu on the left-hand side. Click on it. This will take you to the contacts section. Here, you can manage all your contacts.
Adding Contacts Manually
Once in the contacts section, you can add contacts manually. Click on the ‘New Contact’ button. Fill in the required fields like name and email. Add more details if needed. Click ‘Save’ to add the contact to your list.
Repeat this process for each contact. You can add as many contacts as you need. Keeping your list organized will help with your email campaigns.
Importing Contacts
Importing contacts into your Wix Email Marketing is an essential step. It helps you manage your audience effectively. By having separate contact lists, you can target specific groups. This can increase your email marketing success. Let’s explore how to import contacts into Wix Email Marketing.
Uploading A Csv File
To start, you need a CSV file of your contacts. A CSV file is a simple text file. It holds data in a table format. Each line of the file is a data record. Each record consists of fields separated by commas.
Follow these steps to upload your CSV file:
- Log into your Wix account and go to the Email Marketing section.
- Click on “Contacts” in the menu.
- Select “Import Contacts” and then choose “Upload CSV File”.
- Click “Choose File” and select your CSV file from your computer.
- Click “Upload” to import your contacts.
Mapping Fields Correctly
After uploading your CSV file, you must map the fields. Mapping fields ensures the data matches the correct columns in Wix.
Here are the steps to map your fields correctly:
- Review the list of fields from your CSV file.
- Match each field to the appropriate Wix contact field. For example, map “First Name” to “First Name”, “Email Address” to “Email”.
- Make sure all required fields are mapped. Required fields usually include “Email Address”.
- Click “Next” to complete the mapping process.
Mapping fields correctly is crucial. It ensures your contacts are imported with accurate information. This allows you to send personalized emails.

Credit: profiletree.com
Segmenting Your Contacts
Effective email marketing requires a well-organized contact list. Segmenting your contacts helps you send tailored messages to specific groups. This improves engagement and conversion rates. On Wix Email Marketing, you can easily separate your contacts using tags, labels, and segmentation rules.
Using Tags And Labels
Tags and labels categorize your contacts based on attributes. Tags are like keywords that describe your contacts. For example, you can use tags like “new customer,” “VIP,” or “newsletter subscriber.” Labels are broader categories. They help you group contacts with similar characteristics.
Here’s how to use them:
- Go to your Wix Email Marketing dashboard.
- Select the contact list you want to segment.
- Click on a contact’s name to view their details.
- Add relevant tags and labels to the contact.
Repeat these steps for other contacts. This helps in creating specific groups.
Creating Segmentation Rules
Segmentation rules filter your contacts based on criteria. This makes it easy to target specific groups. Here’s a step-by-step guide:
- Navigate to the “Contacts” section in your Wix dashboard.
- Click on “Create New Segment.”
- Select the criteria for your segment. You can use tags, labels, or other data like location and behavior.
- Name your segment. Ensure the name reflects the criteria used.
- Click “Save” to create the segment.
These rules help you maintain an organized contact list. They also ensure you send the right message to the right people.
| Feature | Description |
|---|---|
| Tags | Keywords that describe contacts. |
| Labels | Broader categories for grouping contacts. |
| Segmentation Rules | Filters contacts based on specific criteria. |
Organize your contacts with tags, labels, and rules. This enhances your email marketing efforts.
Managing Multiple Lists
Managing multiple contact lists in Wix Email Marketing can streamline your email campaigns. It allows you to target specific groups with tailored messages. This increases engagement and conversion rates. Efficient management of these lists is crucial for successful email marketing.
Merging And Splitting Lists
Sometimes, you might need to merge two or more lists. This helps to avoid duplicate contacts and maintain a clean database. To merge lists, select the lists you want to combine. Then, use the merge feature in Wix. It’s quick and easy.
On the other hand, you may need to split a list. This can help target smaller, more specific audiences. To split a list, use the filter options. Create a new list from the filtered results. This makes it easier to manage and target your contacts.
Deleting And Archiving Lists
Over time, some lists may become outdated or irrelevant. In such cases, deleting these lists can keep your database organized. To delete a list, select the list and use the delete option. Be careful, as this action is permanent.
If you might need the list in the future, consider archiving it. Archiving keeps the list but removes it from your active view. This can be a safer option than deleting. You can always restore an archived list if needed.
Automating List Updates
Automating list updates in Wix Email Marketing can save you time and effort. By setting up automation rules, you ensure your contact lists stay current. This helps you target the right audience with each email campaign.
Setting Up Automation Rules
Start by defining the criteria for your contact lists. You can use tags, sign-up forms, or other details. Next, use the Wix Automation tool to create rules based on these criteria. For example, add new subscribers to a specific list automatically.
Using Triggers And Actions
Triggers start the automation process. For instance, a new subscriber can be a trigger. Actions are what happens after the trigger. You might move the subscriber to a certain list. Use Wix’s built-in options to set these triggers and actions easily.
Best Practices For Contact Lists
Create separate contact lists on Wix Email Marketing by organizing your audience based on interests, behaviors, or demographics. This helps send targeted messages, improving engagement and response rates.
Creating separate contact lists on Wix Email Marketing can help you target your audience more effectively. It also keeps your campaigns organized. Following best practices ensures your email lists remain accurate and compliant.Maintaining List Hygiene
Clean your contact lists regularly. Remove invalid email addresses. This reduces bounce rates and improves deliverability. Segment your contacts based on their interests or behaviors. This personalization increases engagement. Always use double opt-in for new subscribers. It confirms their interest and reduces spam complaints.Ensuring Compliance With Laws
Follow email marketing laws like GDPR and CAN-SPAM. Get explicit consent before adding someone to your list. Provide a clear and easy way to unsubscribe. Respect your subscribers’ privacy. Store their data securely. Be transparent about how you use their information. This builds trust and keeps you compliant. “`
Credit: support.wix.com

Credit: optinmonster.com
Frequently Asked Questions
How Do I Create A New Contact List On Wix?
Go to Wix Email Marketing. Click on “Contacts. ” Then, select “Create New List. “
Can I Import Contacts To A New List?
Yes, you can import contacts from a CSV file. Go to “Contacts” and click “Import. “
How Do I Segment Contacts In Wix?
Use the “Segments” feature. Filter contacts by criteria like location or engagement.
Can I Remove Contacts From A List?
Yes, select the contacts you want to remove and click “Delete” or “Remove from List. “
How Do I Send An Email To A Specific List?
During email creation, select the desired contact list under “Recipients. ” Then, send your email.
Conclusion
Creating separate contact lists on Wix Email Marketing is straightforward. Follow the steps outlined to keep your contacts organized. This helps in targeting your emails more effectively. Organized lists lead to better engagement and results. Take advantage of these tools to enhance your email marketing strategy.
Stay consistent and watch your email campaigns improve. Happy emailing!


Leave a Reply