
Sending an email in Marketo is straightforward. First, create your email content.
Then, follow a few steps to send it out. Marketo is a powerful marketing tool. It helps businesses reach their audience through emails. But, new users might find it complex. This guide will simplify the process. You’ll learn how to create, customize, and send emails in Marketo.
By the end, you’ll feel confident using this tool. Let’s dive in and make email marketing easy!
Getting Started
Sending an email in Marketo is a simple process. Start by creating an account and logging in. Follow these steps to get started.
Creating A Marketo Account
Before you can send emails, you need an account. Follow these steps to create your Marketo account:
- Visit the Marketo website.
- Click on the Sign Up button.
- Fill in your personal details like name, email, and company.
- Choose a password that is strong and secure.
- Click on the Create Account button.
Logging In
Once you have created your account, you need to log in. Here’s how:
- Go to the Marketo login page.
- Enter your email address and password.
- Click on the Log In button.
- If prompted, complete the two-factor authentication for extra security.
Now you are ready to start using Marketo to send emails!

Credit: www.youtube.com
Setting Up Your Email
Creating an email in Marketo is a straightforward process. This guide will walk you through setting up your email step by step. Let’s dive into the essential steps to ensure your email is set up correctly.
Navigating To Email Section
First, log in to your Marketo account. Once logged in, follow these steps:
- Go to the Marketing Activities tab.
- Locate and click on the campaign folder where you want to create the email.
- Click on the New button and select New Local Asset.
- Choose Email from the list.
Now you are in the email creation section. You can start by choosing a template.
Choosing An Email Template
Marketo offers a variety of email templates. To choose one:
- Select the Template Picker option.
- Browse through the available templates.
- Click on a template to preview it.
- Once you find the suitable template, click Select.
After selecting a template, you can start customizing your email. This includes adding images, text, and other elements.
Using a template helps maintain consistency and saves time.
Customizing Your Email
Customizing your email in Marketo is simple. Personalization makes your emails more engaging. You can edit content, add images, and insert links. These steps will help you create a professional email that connects with your audience.
Editing Content
First, choose an email template. Click on the text box to start editing. Write your message in clear and simple language. Use short sentences for better readability. Break your text into small paragraphs. This makes it easier for your audience to read. Always check for grammar and spelling mistakes.
Adding Images And Links
Images can make your email more attractive. Click on the image icon in the editor. Upload the image from your computer. Ensure the image size is appropriate. Large images may slow down the email loading time.
Links guide your audience to more information. Highlight the text you want to link. Click on the link icon in the editor. Enter the URL in the box. Check that the link works properly. Broken links can frustrate your readers.

Credit: mailbakery.com
Personalizing Emails
Personalizing emails can significantly boost engagement. It helps to create a connection with the audience. This section will explore how to personalize emails in Marketo.
Using Tokens
Tokens are placeholders for data. They allow you to insert personalized information into emails. Here are some common tokens:
- {{lead.First Name}} – Inserts the recipient’s first name.
- {{lead.Last Name}} – Inserts the recipient’s last name.
- {{company.Company Name}} – Inserts the recipient’s company name.
To use a token, simply insert it into your email template. For example, “Hello {{lead.First Name}},” becomes “Hello John,” for John Doe. This makes the email feel more personal and engaging.
Dynamic Content
Dynamic content allows you to show different content to different users. It is based on their attributes or behaviors. Here’s how you can use dynamic content:
- Go to your email template.
- Select the section you want to make dynamic.
- Click on the “Make Dynamic” button.
After that, you can set rules for what content to show to whom. For example, you can show one image to first-time buyers and another to returning customers. This makes the email more relevant to each user.
In summary, personalizing emails using tokens and dynamic content in Marketo can improve engagement and relevance. These features help to create a more tailored experience for each recipient.
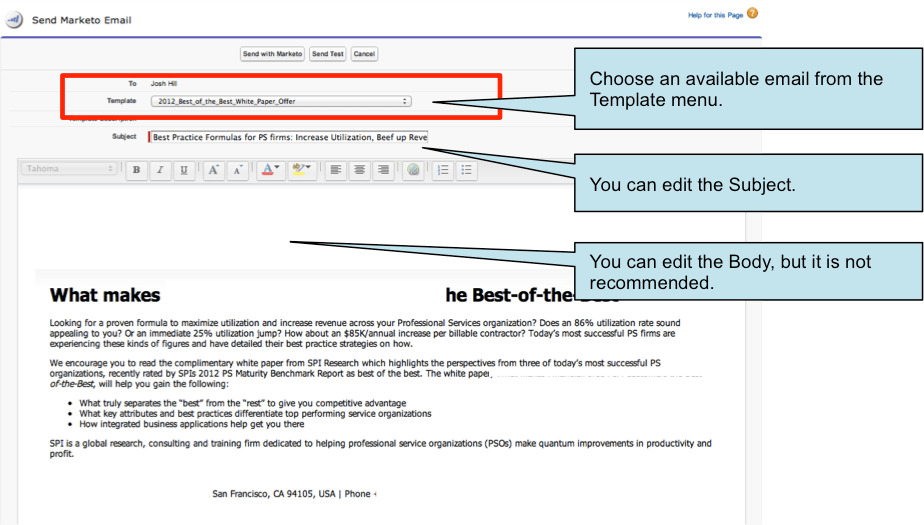
Preview And Test
Sending emails in Marketo involves a few essential steps, and one of the most critical is the Preview and Test phase. This step ensures your email looks perfect and functions correctly before sending it to your audience. Let’s dive into the details.
Previewing Your Email
Before sending your email, preview it to check its appearance. Marketo provides a built-in preview tool. Follow these steps to preview your email:
- Open your email in the Marketo editor.
- Click on the Preview tab.
- Review the email in different formats (desktop and mobile).
Check for any formatting issues or errors. Ensure your images, links, and text display correctly.
Sending Test Emails
Testing your email by sending it to yourself or a colleague helps catch any issues. Here’s how to send a test email:
- Open your email in the Marketo editor.
- Click the Send Test button.
- Enter the email address you want to send the test to.
- Click Send.
Review the test email for any errors or display issues. Make sure all links work and images load properly. If any changes are needed, go back to the editor and make them.
Scheduling And Sending
Sending an email in Marketo is simple. You can send it immediately or schedule it for later. This guide will help you understand both methods.
Setting Up A Schedule
Scheduling emails allows you to plan your campaigns better. Follow these steps:
- Open Marketo and go to the Email section.
- Select the email you want to send.
- Click on Schedule.
- Choose the date and time for your email.
- Review the details and click Save.
Here’s a brief table to summarize the steps:
| Step | Action |
|---|---|
| 1 | Open Marketo and go to the Email section. |
| 2 | Select the email you want to send. |
| 3 | Click on Schedule. |
| 4 | Choose the date and time for your email. |
| 5 | Review the details and click Save. |
Sending Immediately
If you need to send an email right away, follow these steps:
- Go to the Email section in Marketo.
- Select the email you want to send.
- Click on Send Now.
- Confirm the recipients and details.
- Click Send to deliver the email immediately.
Using these steps, you can ensure your email reaches the audience at the right time. Whether you schedule it or send it immediately, Marketo makes the process easy and efficient.
Analyzing Performance
After sending an email in Marketo, it’s crucial to analyze its performance. This helps you understand what worked and what didn’t. By analyzing performance, you can improve future campaigns. This section covers key metrics to look at.
Tracking Open Rates
Open rates show how many people opened your email. Marketo tracks this for you. High open rates mean your subject line worked well. Low open rates suggest room for improvement. Check your open rates regularly. They give you quick feedback on your email’s first impression.
Analyzing Click-through Rates
Click-through rates (CTR) show how many people clicked on links in your email. This metric measures engagement. High CTR means your content interested your audience. Low CTR means your content needs improvement. Regularly check CTR to understand what links work best. Adjust your content based on this data.
Credit: etumos.com
Best Practices
Sending an email through Marketo can be simple. But following best practices ensures your emails are effective and reach the right audience. This section covers the most important practices for maintaining email lists and avoiding spam filters.
Maintaining Email Lists
Keeping your email lists clean is crucial. Here’s how you can do it:
- Regularly update your email lists. Remove inactive or incorrect addresses.
- Use double opt-in to confirm subscribers’ interest.
- Segment your lists. Target specific groups for better engagement.
Avoiding Spam Filters
Getting past spam filters is essential. Follow these tips:
- Use a recognizable sender name and email address.
- Include a clear subject line. Avoid all caps and too many exclamation marks.
- Ensure your content is relevant and valuable to the recipient.
- Include an unsubscribe link in all emails.
- Avoid using spammy words like “free,” “guarantee,” and “act now.”
By following these best practices, your emails will have a better chance of reaching your audience. They will also be more likely to engage with your content. Keep your lists clean and your content valuable.
Frequently Asked Questions
How Do I Send An Email In Marketo?
To send an email in Marketo, create a new email program. Follow the steps to build and send.
Can I Schedule Emails In Marketo?
Yes, Marketo allows you to schedule emails. Set the date and time during the setup.
What Is An Email Program In Marketo?
An email program in Marketo is a tool. It helps you create, test, and send emails.
How Do I Test Emails In Marketo?
Use the “Send Test” feature. This sends a test email to your address for review.
Can I Track Email Performance In Marketo?
Yes, Marketo provides detailed reports. Track opens, clicks, and other metrics easily.
Conclusion
Sending an email in Marketo is simple and effective. Follow the steps outlined. Start by creating your email template. Customize it to fit your brand. Next, choose your audience carefully. Make sure your message reaches the right people. Review your email for errors.
Always test before sending. Finally, schedule or send your email. Track your results to improve future campaigns. With practice, emailing in Marketo becomes easy. Keep learning and refining your skills. You’ll see better engagement and results. Happy emailing!
Leave a Reply